Klaviyo can do a lot.
That’s the good news.
It’s also why it can feel overwhelming the first time you open it.
Forms.
Flows.
Segments.
Campaigns.
Templates.
Analytics.
Shopify data.
Tracking.
If you’re setting up Klaviyo for your Shopify store, the goal is not to build everything at once.
The goal is to build the right foundation first.
Because if the foundation is messy, your emails might still look fine, but they won’t do the bigger job:
Following up with the right customer at the right moment.
This guide gives you a practical Klaviyo setup checklist, so you don’t end up sending random campaigns before your data, flows, segments, and reporting are ready.
If you’re still deciding whether Klaviyo makes sense for your brand, read Is Klaviyo Worth It for Small Shopify Businesses? first.
Quick Answer: What Should You Set Up First in Klaviyo?
Here’s the short version.
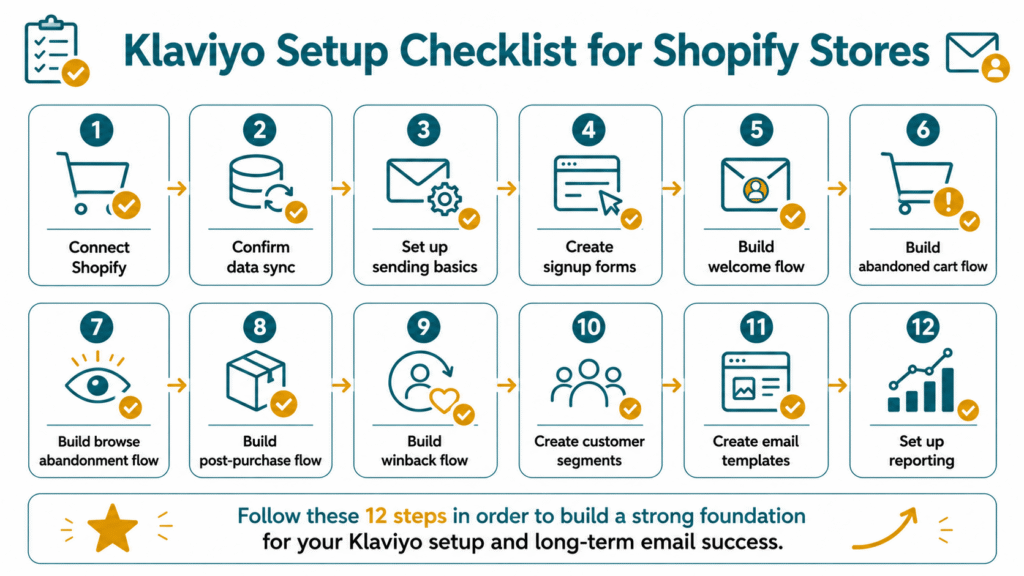
If you want Klaviyo to work well for your Shopify store, set up these in order:
Priority | Setup Item | Why It Matters |
1 | Connect Shopify and Klaviyo | Lets your store data power your email system |
2 | Confirm Shopify data is syncing | Makes flows and segments work properly |
3 | Set up your sending basics | Helps with branding, trust, and deliverability |
4 | Create or improve signup forms | Grows your owned list |
5 | Build your welcome flow | Turns new subscribers into first-time buyers |
6 | Build your abandoned cart flow | Recovers high-intent shoppers |
7 | Build your browse abandonment flow | Follows up with product viewers |
8 | Build your post-purchase flow | Supports customers after the first sale |
9 | Build your winback flow | Brings inactive buyers back |
10 | Create basic customer segments | Stops you from sending every email to everyone |
11 | Create simple email templates | Makes campaigns faster and more consistent |
12 | Set up reporting | Shows what’s working and what needs improvement |
That’s the setup order that gives most Shopify stores a solid starting point.
Step 1: Connect Shopify and Klaviyo
This is the real starting line.
Before you build flows, segments, or campaigns, Klaviyo needs access to your Shopify store data.
That connection is what allows Klaviyo to understand customer actions like browsing, adding to cart, checking out, and buying.
Without the integration, Klaviyo is just an email tool.
With the integration, it becomes a customer follow-up system.
Your goal here is simple:
- Connect Klaviyo to Shopify
- Make sure the integration is authorized correctly
- Let Klaviyo start pulling in your customer and order data
Klaviyo explains that integrating with Shopify brings customer profile and order data into Klaviyo, enables onsite tracking and sign-up forms, and can sync data back to Shopify.
Source: Getting started with Shopify
If you want the bigger strategic context behind this, read Klaviyo email marketing for Shopify stores.
Step 2: Confirm Your Shopify Data Is Syncing
Connecting the app is one thing.
Making sure the right data is actually syncing is another.
Don’t assume it’s working just because the integration is turned on.
You want to confirm that the customer actions you care about are flowing into Klaviyo properly.
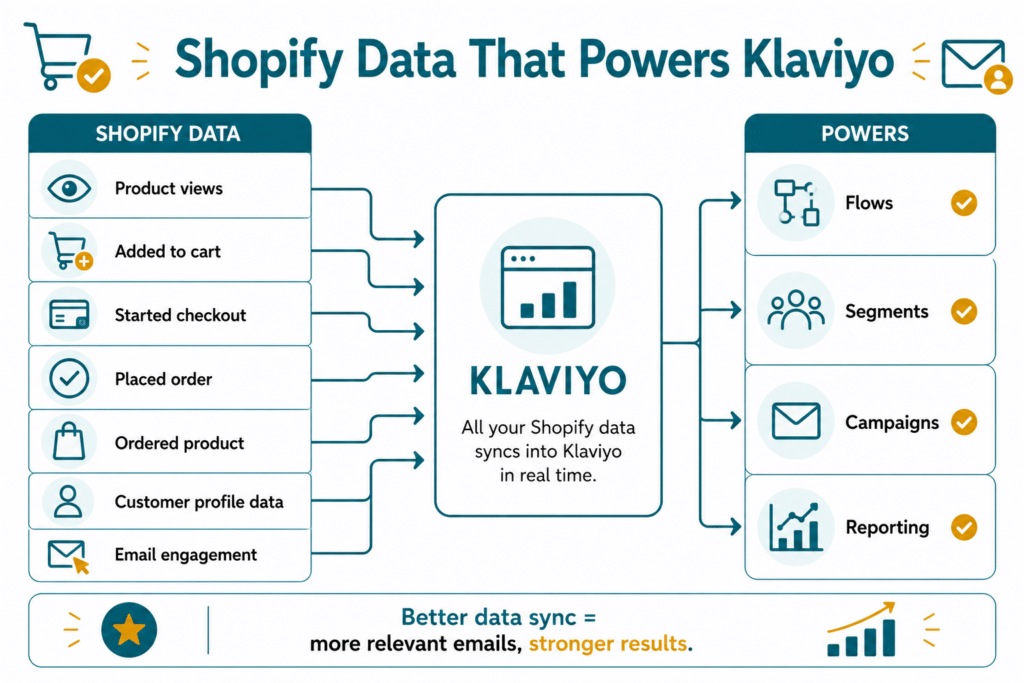
Here are the main data points to check:
Shopify Data | Why It Matters in Klaviyo |
Product views | Powers browse abandonment emails |
Added to cart | Powers cart recovery follow-up |
Started checkout | Helps support checkout recovery |
Placed order | Starts post-purchase follow-up |
Ordered product | Helps with product-based targeting |
Customer profile data | Supports personalization and segmentation |
Email engagement | Helps identify engaged and inactive subscribers |
Why does this matter?
Because your flows and segments depend on this data.
If the data is incomplete or delayed, your email system will feel weak even if your copy and design are good.
A lot of Shopify stores think they have a Klaviyo problem, when they actually have a setup problem.
Source: Getting started with Shopify
For a deeper explanation, read what Shopify data you can use inside Klaviyo.
Step 3: Set Up Your Sending Basics
Now that the data side is working, fix your sending foundation.
This is where a lot of stores rush.
They jump straight into email design but forget the basics that affect trust and deliverability.
At minimum, set up:
- Your sender name
- Your sender email address
- Your reply-to email address
- Your brand logo
- Your footer details
- Your unsubscribe link
- Your compliance basics
- Your branded sending domain, if you’re ready
This step matters because customers notice the small things.
If your emails come from an unfamiliar sender name, or if your footer looks incomplete, trust drops fast.
And if you skip sending basics completely, even a good email campaign can feel less credible.
Before you worry about advanced automation, make sure your emails are recognizable, branded, and ready to send.
If your account already has flows, forms, and campaigns but the setup feels messy, an email marketing audit can help identify the biggest gaps before you rebuild everything.
Step 4: Create or Improve Your Signup Forms
Before you send better emails, you need a clear way to collect the right subscribers.
That’s where your signup forms come in.
A lot of Klaviyo setups fail before they even begin because the store has weak list growth.
If your forms are confusing, untimed, or unconvincing, your flows will have fewer people to work with.
Start with the basics:
- Popup form
- Embedded form
- Footer signup
- Exit-intent form, if useful
- A clear offer or reason to sign up
Here are some simple offer angles that work well for Shopify stores:
Offer Type | Example |
First-order discount | “Get 10% off your first order” |
Early access | “Join the VIP list” |
Product guide | “Find the right product for your routine” |
Quiz or recommendation | “Get a personalized recommendation” |
Launch list | “Be first to know when we drop new products” |
Your form does not need to be clever.
It needs to be clear.
People should understand:
- What they’re getting
- Why they should sign up
- What kind of emails they’ll receive
That clarity improves both list quality and customer expectations.
Step 5: Build Your Welcome Flow
Your welcome flow is usually the first real automation you should build.
Why?
Because every new subscriber who joins your list is a fresh opportunity.
And if you don’t follow up properly, that interest can go cold fast.
A welcome flow should help new subscribers:
- Understand your brand
- Learn what makes your products different
- See your bestsellers or key collections
- Build trust
- Take a first step toward purchase
A simple welcome flow can include:
- A welcome email
- A brand and product introduction
- A trust-building email with reviews, proof, or FAQs
- A gentle purchase push
The goal is not just to “say hi.”
The goal is to turn curiosity into a first order.
Klaviyo’s flow guidance highlights the welcome series as one of the high-impact flows brands should start with.
Source: Getting started with flows
When you’re ready, you can go deeper with welcome flow for Shopify stores.
Step 6: Build Your Abandoned Cart Flow
This is one of the easiest wins for most Shopify stores.
Someone adds a product to cart, shows buying intent, then leaves.
That’s not a dead lead.
That’s a warm lead that needs follow-up.
Your abandoned cart flow should:
- Remind the shopper what they left
- Show the product clearly
- Reinforce product value
- Handle hesitation
- Use trust elements if helpful
- Give a clear CTA back to cart or checkout
This is not the place to overcomplicate.
Clear reminder.
Good timing.
Strong product context.
Simple next step.
That’s enough to start.
Klaviyo’s flow guidance also includes abandoned cart as a key flow to prioritize early.
Source: Getting started with flows
Related read: abandoned cart flow for Shopify stores
Step 7: Build Your Browse Abandonment Flow
Not every shopper adds to cart.
Some people browse, compare, hesitate, and leave.
That doesn’t mean they aren’t interested.
It just means they may need a softer follow-up.
Your browse abandonment flow should:
- Follow up after product views
- Feel helpful, not pushy
- Reintroduce the viewed product
- Highlight product benefits
- Show similar or related options
- Add social proof when useful
This flow helps capture interest earlier in the buying journey.
It’s especially useful for stores with longer consideration cycles or products that need more explanation.
Related read: browse abandonment emails for Shopify stores
Step 8: Build Your Post-Purchase Flow
A lot of stores put all their attention on getting the first order.
Then they go silent after the sale.
That’s a missed opportunity.
Your post-purchase flow helps customers feel supported after they buy.
It can also help increase repeat purchase rate over time.
A good post-purchase flow can:
- Thank the customer
- Explain what happens next
- Help them use the product properly
- Recommend complementary products
- Ask for a review at the right time
- Encourage a second order
This matters even more if you sell products that need education, replenishment, or repeat use.
Your post-purchase flow is not just customer service.
It’s part of retention.
Klaviyo’s recommended starting flows also include post-purchase.
Source: Getting started with flows
Related read: post-purchase emails for Shopify stores
Step 9: Build Your Winback Flow
Not every customer buys again on their own.
Some need a reason to come back.
That’s what your winback flow is for.
A winback flow targets customers who haven’t bought in a while and gives them a reason to re-engage.
Keep it simple.
Your winback flow can:
- Remind them about your brand
- Show what’s new
- Recommend relevant products
- Reintroduce a bestseller
- Use an incentive if needed
- Make the return feel easy
You do not need to beg lapsed buyers.
You just need a clear re-entry point.
Klaviyo includes winback as another key flow worth prioritizing.
Source: Getting started with flows
Related read: winback emails for Shopify stores
If you want these core flows planned, written, designed, and reviewed properly, our Klaviyo email marketing services can support lifecycle flows, campaigns, segmentation, and reporting.

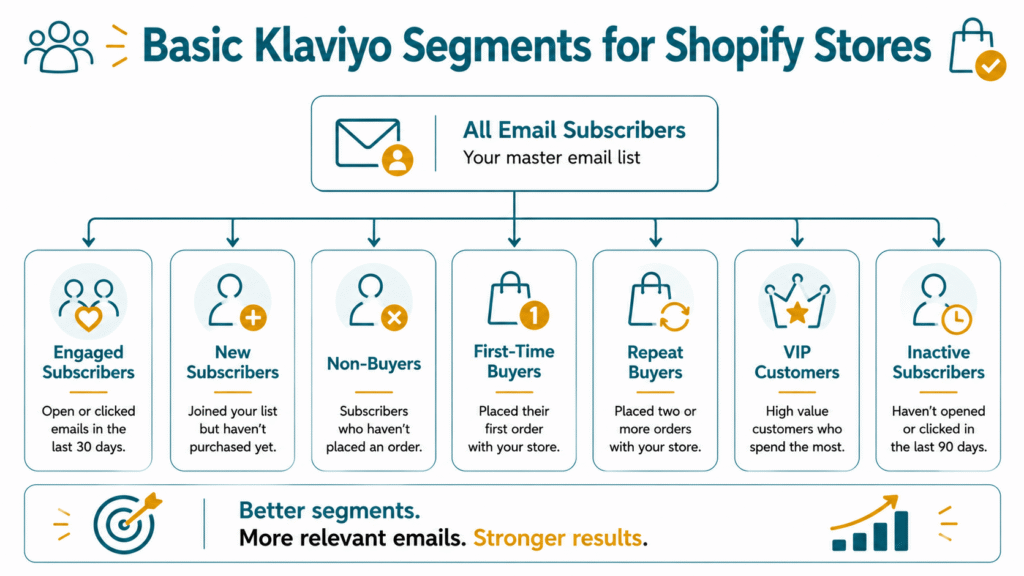
Step 10: Create Your Basic Customer Segments
If you send every email to everyone, you’ll eventually hurt performance.
Why?
Because not every subscriber is in the same stage.
Some are new.
Some haven’t bought yet.
Some buy often.
Some have gone inactive.
That’s why you need segments.
Start simple.
You do not need dozens of micro-segments right away.
Start with the practical ones:
Segment | Why It Matters |
Engaged subscribers | Best audience for regular campaigns |
New subscribers | Need first-purchase guidance |
Non-buyers | Need product education and trust |
First-time buyers | Need post-purchase support |
Repeat buyers | Good for loyalty and recommendations |
VIP customers | Good for exclusives or early access |
Inactive subscribers | Need careful re-engagement or suppression |
Klaviyo’s segment conditions reference shows the platform supports segment building around profile properties, what someone has done, what someone has not done, and other qualifying conditions.
Source: Segment conditions reference
Related read: customer segments every Shopify store should use
Step 11: Create Simple Email Templates
Once your forms, flows, and segments are taking shape, make campaign sending easier.
You do that by preparing a few simple templates.
Not twenty.
Just the useful ones.
Start with templates for:
- Regular campaign
- Product feature email
- Review or social proof email
- Sale or promo email
- Educational email
- Flow email
Templates help you move faster without making every send feel random.
They also help maintain visual consistency across your campaigns.
A good template should prioritize:
- Mobile readability
- Clear hierarchy
- Clean CTA placement
- Product clarity
- Brand consistency
Don’t overdesign.
A template that’s easy to read and easy to reuse is more valuable than one that looks impressive but slows everything down.
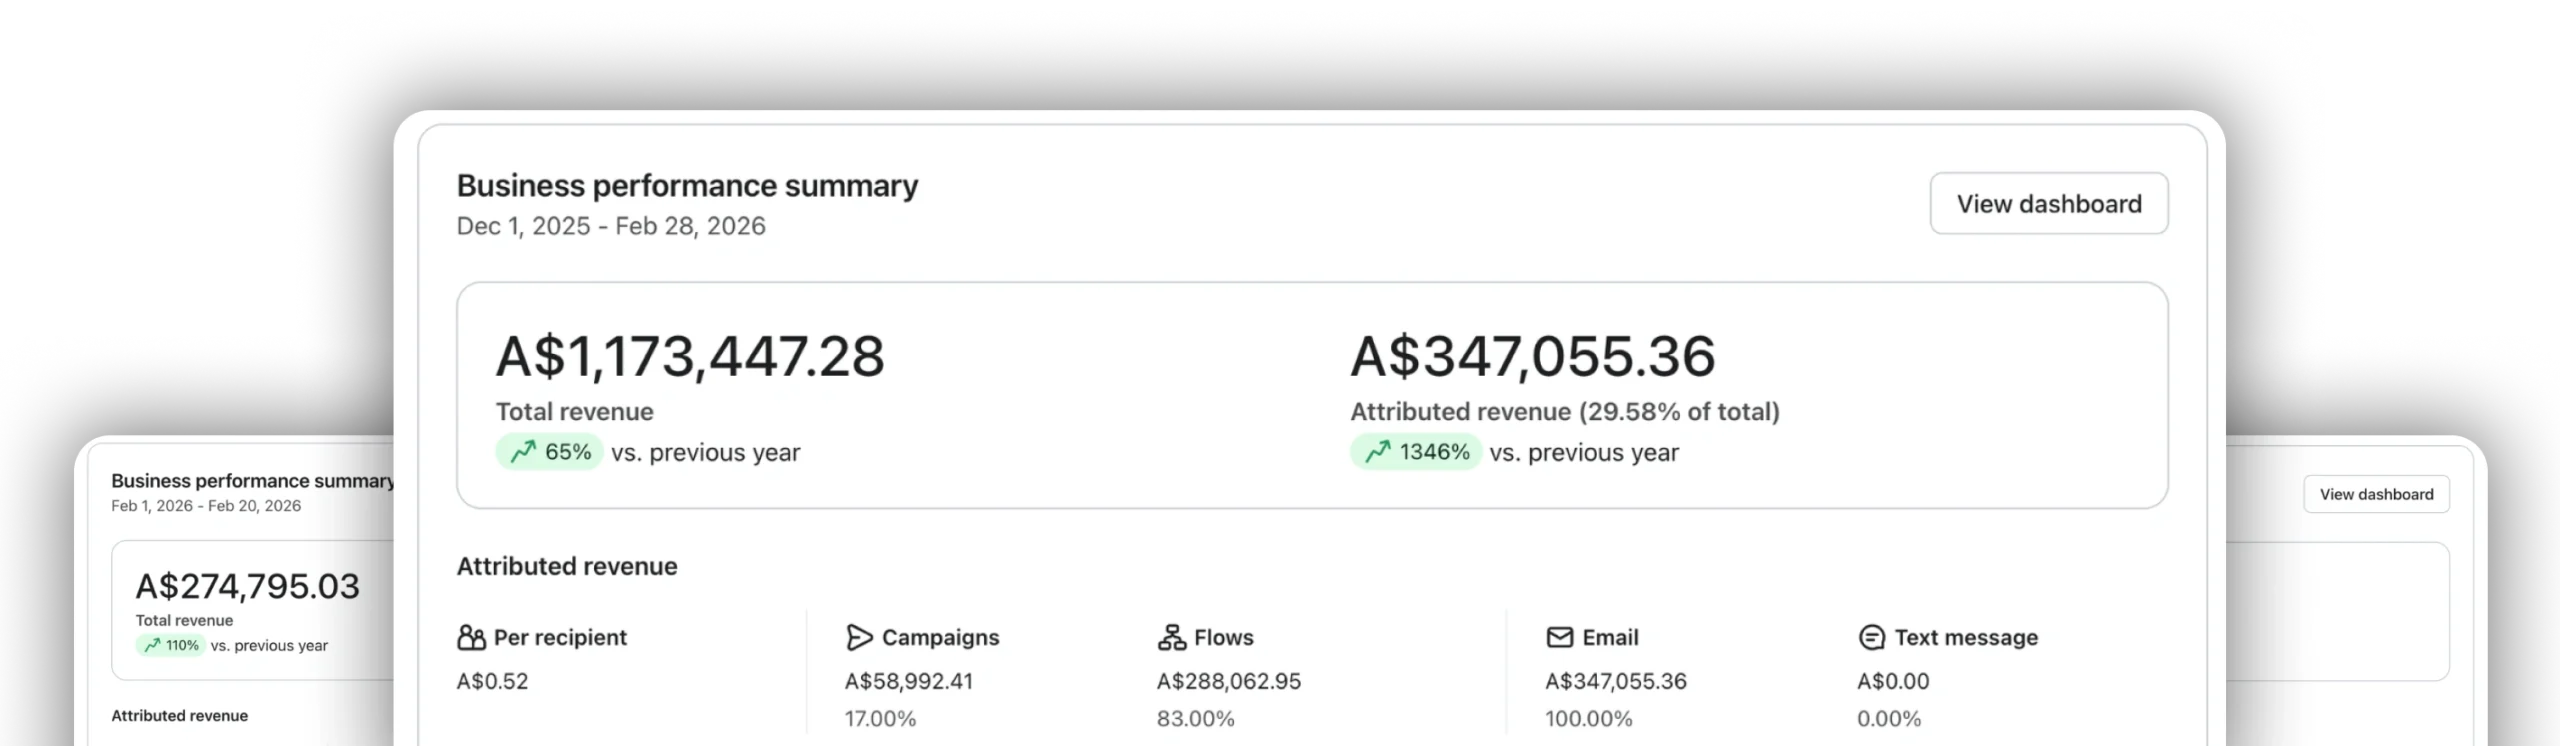
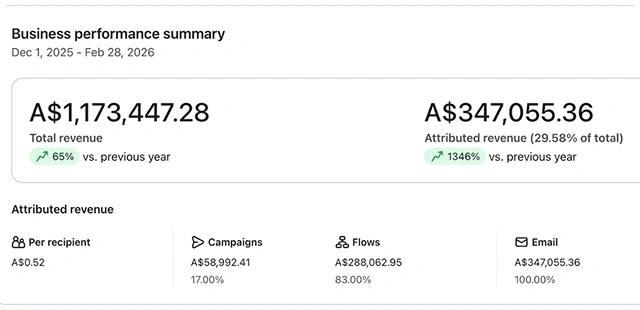
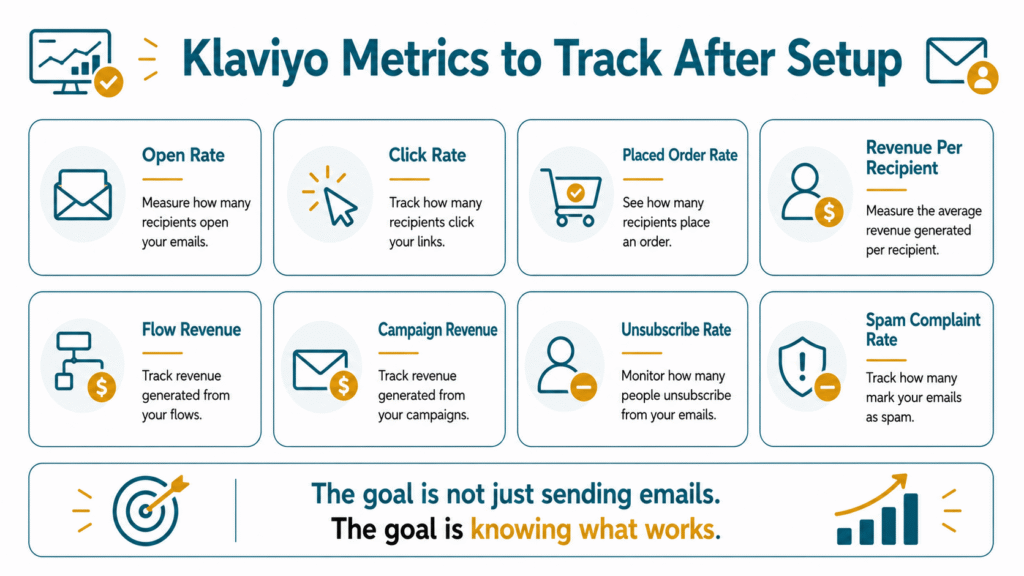
Step 12: Set Up Reporting and Know What to Track
The goal is not just sending emails.
The goal is knowing what works.
If you don’t review performance, your Klaviyo setup stays incomplete.
Start by tracking:
Metric | Why It Matters |
Open rate | Shows if your sender and subject line earn attention |
Click rate | Shows if people are taking action |
Placed order rate | Shows if emails help drive purchases |
Revenue per recipient | Shows campaign quality and audience fit |
Flow revenue | Shows how automations perform |
Campaign revenue | Shows how one-time sends perform |
Unsubscribe rate | Helps monitor message relevance |
Spam complaint rate | Helps monitor trust and deliverability |
Klaviyo’s campaign analytics documentation explains that campaign reporting includes engagement and conversion metrics. Its flow analytics documentation also helps brands review flow performance over time.
Source: Understanding available campaign analytics
Source: Understanding flow analytics
Related read: email marketing metrics every Shopify store should track
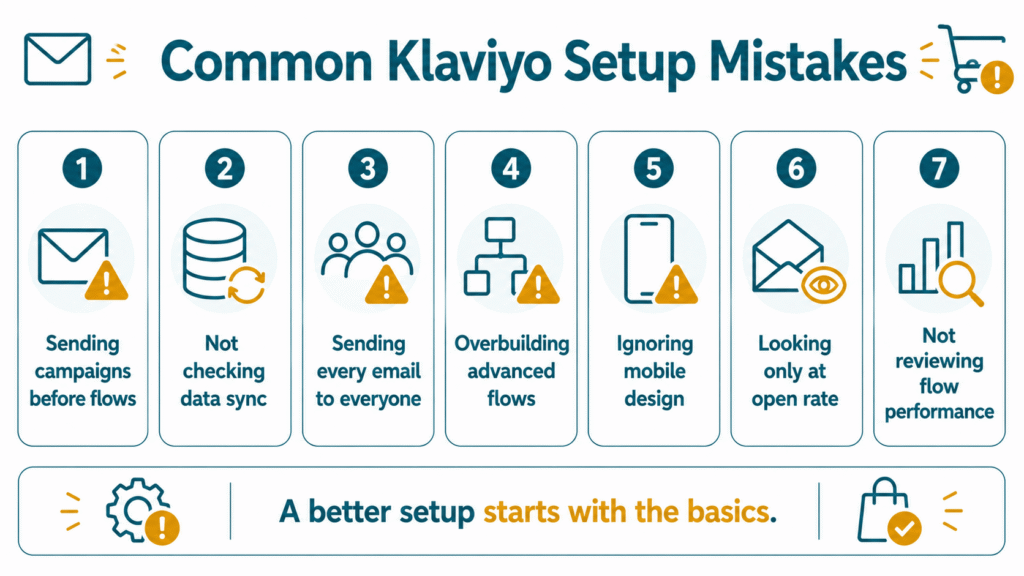
Common Klaviyo Setup Mistakes to Avoid
A lot of Klaviyo setups go wrong in predictable ways.
Here are the common ones:
1. Sending campaigns before your core flows are ready
You start broadcasting emails before your welcome, cart, or post-purchase basics exist.
2. Not checking your Shopify data sync
You assume the integration is working, but your triggers and segments are incomplete.
3. Sending every email to everyone
This usually hurts relevance and performance over time.
4. Overbuilding advanced flows too early
You create too many automations before the basics even work.
5. Ignoring mobile design
Most of your audience will probably open on mobile first.
6. Looking only at open rate
Open rate matters, but it’s not the full story.
7. Not reviewing flow performance
A flow is not “done” just because it’s turned on.
The fix is simple:
Build the basics.
Check the data.
Review performance.
Improve over time.
What You Don’t Need to Set Up Right Away
This part matters because not everything is urgent.
You do not need to set up all of this on day one:
- Too many advanced flows
- Complex predictive analytics
- Too many micro-segments
- Overdesigned templates
- SMS, if it’s not part of your strategy yet
- Loyalty or referral integrations you’re not ready to use
- Complicated personalization logic
Start with the foundation.
Then add complexity later.
That approach keeps your setup cleaner, your priorities clearer, and your team less overwhelmed.
Final Thoughts
Klaviyo setup does not need to be complicated.
But it should be intentional.
If you start with the right order, Klaviyo becomes much easier to manage.
Start with:
- Shopify integration
- Data sync
- Sending basics
- Signup forms
- Core flows
- Customer segments
- Simple templates
- Reporting
That gives your Shopify store a stronger email foundation before you try to get advanced.
And that’s the real goal.
Not just “having Klaviyo.”
But setting it up in a way that helps you follow up better, recover missed sales, and build a more useful retention channel.
Want to Know If Your Klaviyo Setup Is Built Properly?
If your Shopify store already has traffic, carts, subscribers, and customers, Klaviyo should do more than send campaigns.
It should help you follow up, recover missed sales, support first-time buyers, and track what’s working.
FAQs About Setting Up Klaviyo for Shopify
How do I set up Klaviyo for Shopify?
Start by connecting Shopify and Klaviyo, confirming your data sync, setting your sending basics, creating signup forms, building your core flows, creating simple segments, preparing email templates, and tracking performance.
What should I set up first in Klaviyo?
Start with the foundation first: Shopify integration, data sync, sending basics, forms, welcome flow, abandoned cart flow, post-purchase flow, basic segments, and reporting.
What Klaviyo flows should Shopify stores start with?
Most Shopify stores should start with a welcome flow, abandoned cart flow, browse abandonment flow, post-purchase flow, and winback flow.
Do I need signup forms in Klaviyo?
Yes. Signup forms help you grow your owned email list and feed new subscribers into your welcome flow.
What customer segments should I create in Klaviyo?
Start with engaged subscribers, new subscribers, non-buyers, first-time buyers, repeat buyers, VIP customers, and inactive subscribers.
How do I know if Klaviyo is working?
Track click rate, placed order rate, revenue per recipient, flow revenue, campaign revenue, unsubscribe rate, and spam complaint rate. Those metrics tell you much more than open rate alone.
Can I set up Klaviyo myself?
Yes, you can set up the basics yourself if you follow a clear checklist. But if you want deeper flow strategy, stronger segmentation, and better reporting, expert help can speed things up.
What are common Klaviyo setup mistakes?
Common mistakes include sending campaigns before flows are ready, not checking data sync, sending every email to everyone, overbuilding advanced flows too early, ignoring mobile design, and only looking at open rate.

Jasmin Umali
Jasmin Umali is the Founder of Your Proactive Media and a Klaviyo email marketing strategist with 6 years of experience helping ecommerce brands generate an additional 20%–30% or more revenue through email marketing.